Worker Pool Pattern
Hey everyone! How’s it going? This is my first post here on the blog in a series that I’m excited to share with you about concurrency models using Golang. For today, I’ve chosen to introduce a model known as the Worker Pool. But what exactly is a worker pool?
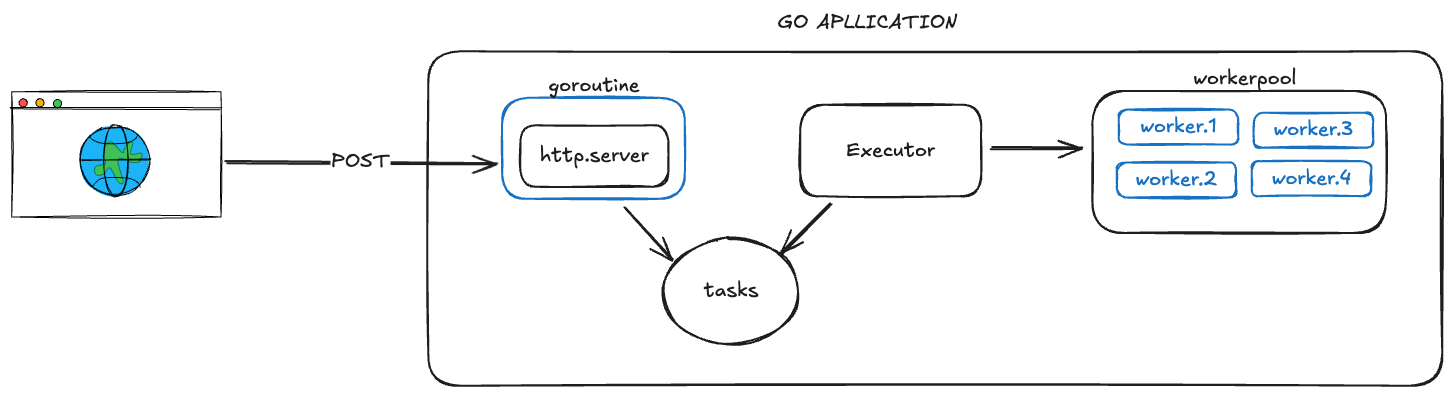
Basically, it’s a concept where each goroutine – also called workers – waits to receive tasks to execute. This model brings several advantages and disadvantages, but before we dive into that, let’s try to visualize how this works.
How it Works?
In this basic example, we have a web application in Go that implements a worker pool. When someone calls this application, our software doesn’t immediately execute the task. Instead, it stores the task in a task list and then returns a response to the user. Meanwhile, in another goroutine, the executor – acting as a consumer – listens for new tasks in the list and checks if there are available workers to execute them.
Benefits of a Worker Pool
But what’s the benefit of this model? One of the greatest advantages is preventing a goroutine leak. Imagine we’re operating with a limited scope of RAM/CPU for our application and we’re dealing with a low RPS (Requests Per Second), like 30 RPS. If each task takes about 20 seconds to process, we’d only be handling 600 goroutines open simultaneously, which is manageable and wouldn’t heavily strain our infrastructure.
Now, let’s suppose there are usage spikes and our RPS jumps to 60. In this case, we’d be looking at a minimum of 1200 goroutines processing at the same time. This could become unsustainable at some point. The worker pool model elegantly addresses this issue, as it allows us to define a processing capacity for our application. So, instead of dealing with a goroutine leak during peak times, our application would just slow down. This would trigger our alerts, prompting us to increase the container capacity and the number of workers.
Disadvantages of a Worker Pool
Of course, not everything in software is perfect. There are some disadvantages to consider. If you’ve read this far, you might have already thought of a few, such as the risk of incorrectly defining the number of workers in your pool, which could leave us consistently underneath the task count. This would make our processing slower than simply using a goroutine.
Another important point is how we create the task list. In critical processing scenarios, we might need a way to persist tasks to ensure they aren’t lost if the application crashes. Additionally, there’s the common concurrency issue of monitoring the execution state of these tasks. A well-structured code with properly defined logs can certainly help address this issue, but it’s still worth discussing.
Time to Code!
Enough talking; let’s create a small example to play around with! We’ll start by setting up our structs that will make the worker pool function properly. First, we’ll create a struct for the Worker:
type Worker struct {
    ID        int
    TaskQueue chan Task
}
Basically, our worker has two fields: an ID for identification and a channel that listens for new tasks to process.
type WorkerPool struct {
    Workers   []*Worker
    TaskQueue chan Task
}

type Task struct {
    ID string
}
Next, we create our Worker Pool, which will manage our workers and use the task channel to notify them, along with a simple struct defining the Task.
After that, we’ll create a function that builds the Worker Pool:
func NewWorkerPool(numWorkers int, wg *sync.WaitGroup) *WorkerPool {
    taskQueue := make(chan Task, 1000) // Define a buffered channel


    pool := &WorkerPool{
        Workers:   make([]*Worker, numWorkers),
        TaskQueue: taskQueue,
    }

    for i := 0; i < numWorkers; i++ {
        wg.Add(1)
        pool.Workers[i] = NewWorker(i + 1, wg, taskQueue)
    }

    return pool
}
This function takes a number that represents how many workers we need. It then creates a buffered taskQueue. What does that 1000 mean? It defines the maximum number of tasks the channel can support. If we exceed this limit, the channel won’t throw an error but will wait for space to free up, allowing workers to keep processing.
Now that we’ve created our worker, let’s develop the NewWorker function:
func NewWorker(id int, wg *sync.WaitGroup, taskQueue chan Task) *Worker {
    worker := &Worker{
        ID:        id,
        TaskQueue: taskQueue,
    }

    go worker.start(wg)

    return worker
}

func (w *Worker) start(wg *sync.WaitGroup) {
    defer wg.Done()

    for {
        task := <-w.TaskQueue
        fmt.Printf("Worker %d processing task ID %s\n", w.ID, task.ID)
        time.Sleep(10 * time.Second)
        fmt.Printf("Worker %d finished task ID %s\n", w.ID, task.ID)
    }
}
Here, the NewWorker function creates a new worker using the received attributes, such as ID and the task channel, and then calls .start() to get it to work. The start function contains a loop that listens for tasks on the channel and processes each one as it arrives.
To make this functional, we’ll create a handler that adds new tasks to our channel, which the workers will then process.
var pool *WorkerPool

func main() {
    numWorkers := 4
    wg := &sync.WaitGroup{}
	pool = NewWorkerPool(numWorkers, wg)
	stop := make(chan os.Signal, 1)
	signal.Notify(stop, os.Interrupt, syscall.SIGTERM)
	server := &http.Server{Addr: ":8081"}
	http.HandleFunc("GET /task/{id}", taskHandler)
	go func() {
		fmt.Println("Servidor rodando em :8081")
		if err := server.ListenAndServe(); err != http.ErrServerClosed {
			fmt.Printf("Erro no servidor: %v\n", err)
		}
	}()
	<-stop
    server.Shutdown()
	close(pool.TaskQueue)
	wg.Wait()
	fmt.Println("Shutdown complete")
}

func taskHandler(w http.ResponseWriter, r *http.Request) {
    taskID := r.URL.Path[len("/task/"):]

    pool.TaskQueue <- Task{ID: taskID}
    fmt.Fprintf(w, "Task ID %s added\n", taskID)
}
A detail is the stop variable, which listens for application shutdown signals. If that happens, we close the channel to stop receiving new tasks and wait for all workers to finish the tasks they are still executing. Only then do we shut down the application.
Run the application and make a GET request to the endpoint…
curl http://localhost:8081/task/1
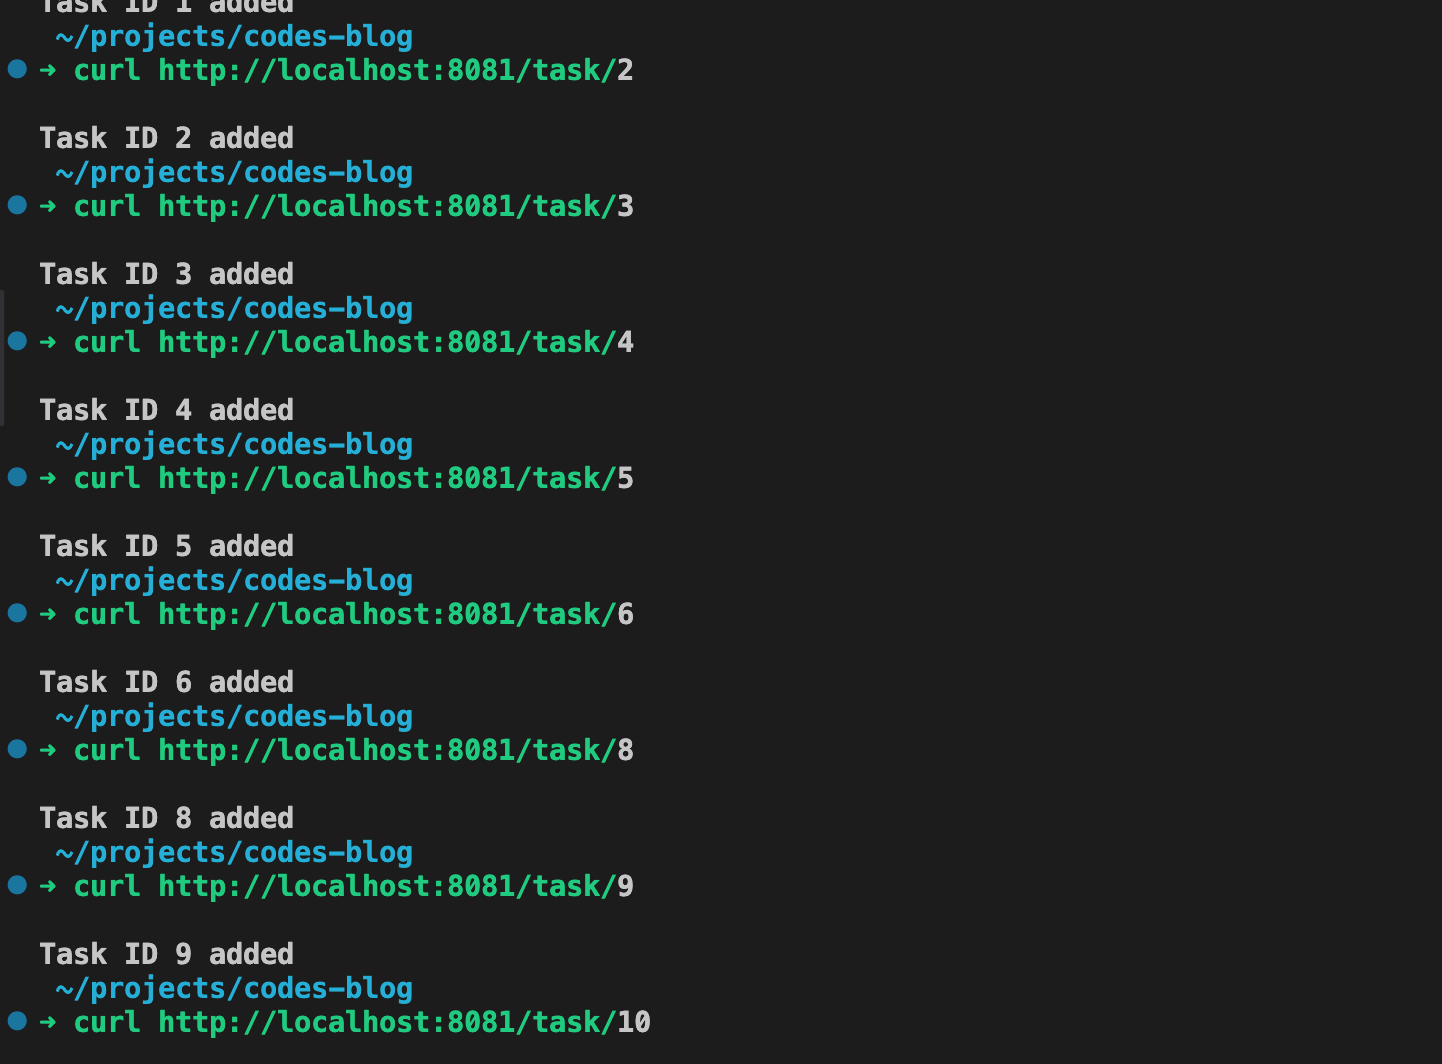
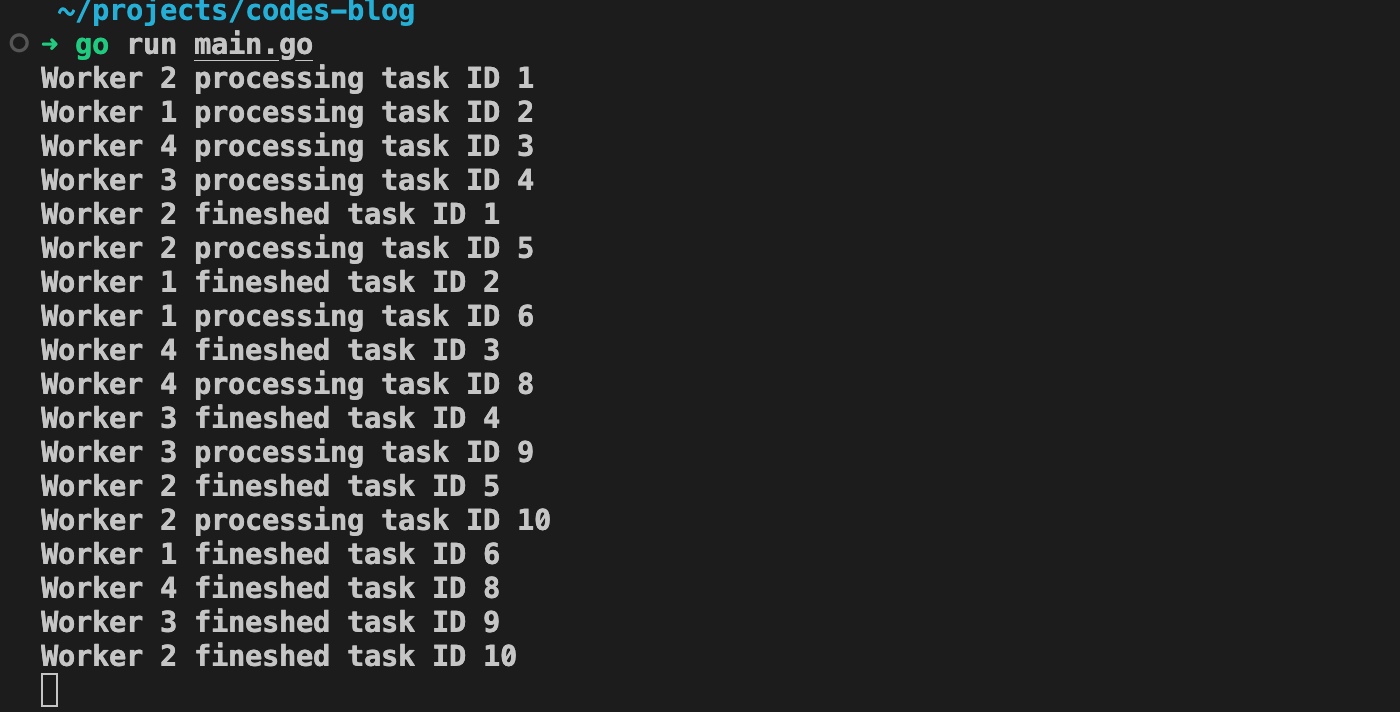
And there you have it! Our worker pool is functioning and processing our tasks. As you can see, there’s no specific order for the workers to pick up tasks. In fact, Worker 2 starts on the first task.
I hope you enjoyed the post! Let’s keep exploring more about Golang and its possibilities!